How to build a malware analysis lab
This guide covers the basics of building your own malware analysis lab

A malware analysis lab should be built with the following goals in mind:
- Isolation from production networks and devices
- An unattributable internet connection
- As close to a real system as possible
- Loaded with tools needed for analysis
Physical Labs vs Virtual Labs
A good malware lab should have multiple machines, in order to test malware for different operating systems, patching levels, and configurations.
Virtual machines are well-suited for this task. Different machines can be built quickly, virtual networks offer great flexibility, and snapshots can be used to rapidly restore virtual machines to a known state after each analysis is complete.
Sometimes, analysis on physical machines may be necessary if malware is expecting specific hardware, such as an industrial control system. Some malware avoids running on virtual machines, although this has become less common because virtual machines are now a common part of production infrastructure.
A physical malware lab is not able to process samples as quickly as a virtual lab, because those systems must by fully reimaged using a solution like dd, FOG, or Clonezilla, which takes much more time than restoring a VM snapshot.
Choosing a VM hypervisor
KVM on Linux, Hyper-V on Windows, and VirtualBox on multiple platforms are all free hypervisors that can be used to host malware analysis VMs. However, VMWare Workstation provides a greater range of configuration options.
VMWare VM detection evasion
To evade VM detection in a VMWare VM, close the VM and add these options to the VM’s .vmx file.
1
2
3
4
5
6
7
8
9
10
11
12
13
14
15
16
17
18
19
20
21
22
23
cpuid.disable_apicExtRegs = "TRUE"
monitor_control.enable_fullcpuid = "TRUE"
cpuid.1.eax = "0---:----:----:----:----:----:----:----"
cpuid.1.ecx = "0---:----:----:----:----:----:----:----"
cpuid.1.edx = "0---:----:----:----:----:----:----:----"
monitor_control.restrict_backdoor = "true"
monitor_control.disable_directexec = "true"
monitor_control.disable_chksimd = "true"
monitor_control.disable_ntreloc = "true"
monitor_control.disable_selfmod = "true"
monitor_control.disable_reloc = "true"
monitor_control.disable_btinout = "true"
monitor_control.disable_btmemspace = "true"
monitor_control.disable_btpriv = "true"
monitor_control.disable_btseg = "true"
monitor_control.enable_extended_core = "true"
monitor_control.enable_paravirt = "true"
#monitor_control.virtual_rdtsc = "false"
isolation.tools.getPtrLocation.disable = "true"
isolation.tools.getVersion.disable = "true"
SMBIOS.reflecthost = "TRUE"
SMBIOS.assettag = "IBM Corporation"
SMBIOS.useShortSerialNumber = "TRUE"
monitor_control.virtual_rdtsc = "false"is commented out using a#, because this option will cause Windows VMs to crash on boot if Hyper-V virtualization technologies are enabled on the host, such as Core Isolation (enabled by default on Windows 11 systems), Secure Core, Application Guard, Windows Subsystem for Linux, or Docker.
Launch VMWare Workstation, and use the GUI to change the MAC Address on the VM’s network interfaces to a different OUI, to prevent the system from being fingerprinted as a VM via the MAC address.
Finally, ensure these changes are saved in a VM snapshot.
Avoid installing VM guest tools inside of a VM
VM guest tools are drivers that can be installed in virtual machines to provide additional integration with the host system, for features like clipboard and folder sharing. They also unnecessarily increase the attack surface for a compromised VM to attack the host system, and makes it easy to identify an analysis system as a VM.
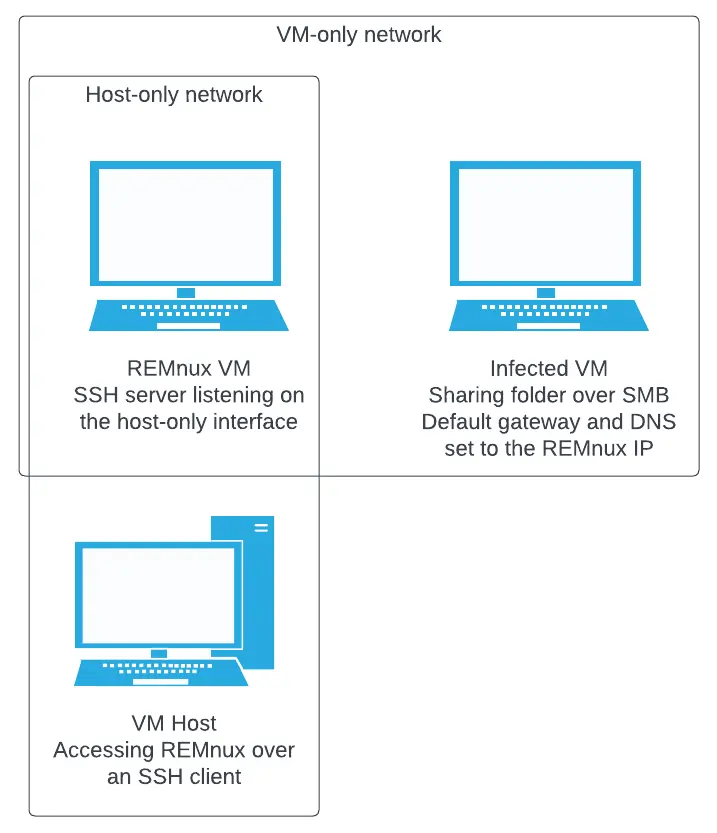
Instead, use a Linux VM like REMnux as a storage space for artifacts. Transfer files to and from REMnux and the infected Windows VMs over SMB, and from REMnux to the host system over SSH. That way, your host OS and the infected VMs never directly interact. This shrinks the attack surface considerably.
VM networks
Create two host-only networks. For one of those networks, uncheck “Connect a host virtual adaptor to this network”. This will allow your lab VMs to talk to each other over that network, but they won’t have network connectivity with your host system. The second host-only network does need your host connected. Add a second network adaptor to the REMnux VM, and connect it to the second host-only network. Additionally, configure the SSH server in REMnux to only bind to the host-only interface, so that infected VMs in the VM network cannot access it.
Configure the network interface of your Windows VMs to use the IP address of the REMnux VM as the default gateway and primary DNS server. That way REMnux can be used to simulate internet traffic and intercept the simulated traffic.
A finished configuration should look like this:
Other networking considerations
Malware labs must be separated from other networks to prevent infections from spilling outside of the lab. At a minimum, the analysis labs themselves should only be accessible one way via a specific interface. In high-risk and/or high security environments, labs should be airgapped completely from everything else. For example, using dedicated laptops or servers that require an analyst to be physically located in the same space as the lab.
Choosing methods to connect the lab to the internet is equally important. You might not want to ever allow your analysis systems to connect to the internet, and opt for simulated connections instead, or give an analyst a variety of connection types to choose from.
It is critical for operational security that sandbox traffic is not attributable to your IP space. There are multiple was of accomplishing this. You could route traffic through Tor, but Tor traffic can easily be identified by tracking the public list of Tor exist nodes. Similarly, commercial VPN services can be identified by tracking their exit nodes. Some of the best options are to use a commodity business internet service or cellular data service that is not tied to your IP space.
Algo VPN is a set of Ansible scripts that simplify the setup of personal WireGuard and/or IPsec VPNs on public cloud services such as Azure, AWS, Digital ocean, GCP, and others. This allows you to quickly spin up and spin down your own VPN exit nodes at will, in a variety of different geographic regions.
Whatever method(s) you choose, configure your sandbox VMs with two network interfaces: One host only interface for swapping files between the host and VM, and another interface for internet traffic. This could be a NAT interface of your host’s internet traffic is already separate, or use a bridged interface if you have a dedicated “dirty line” interface, such as a separate internet connection, or VPN interface. Leave the VM’s internet interface disconnected, and uncheck connect at startup. Before connecting that interface, ensure that the host’s network connections are configured correctly.
REMnux
REMnux is a Linux distribution (based on Ubuntu) that includes a ton of tools for reverse engineering malware. Follow the instructions for setting it up in a VM, or a physical system, depending on how your lab is set up.
Configure Windows lab systems to use different static IP addresses on their host only interface, with the default gateway and primary DNS server set to the host-only network IP address of the REMnux system. This will allow you to have malware connect to simulated internet services running on the REMnux box, where the traffic can be logged.
Windows VM tasks
Here are some tasks to do on your Windows analysis VMs:
Disable automatic updates
Automatic updates can cause multiple problems in a malware analysis lab. They generate a lot of noise on the disk, network, and registry. They also break any sort of version pinning that you may want to retain for analysis. Disable automatic windows update downloads and updates, Office updates, browser updates, and automatic updates for any other tools, such as Visual Studio Code.
Windows Update
- In the Start Menu search, type
gpeditand press enter - Navigate to Computer Configuration> Administrative Templates> Windows Components> Microsoft Windows Update
- Set the
Configure Windows Updatepolicy toDisabled
On Windows 11, this setting is located under Computer Configuration> Administrative Templates> Windows Components> Microsoft Windows Update> Legacy Policies
For thoroughness, also disable the Windows Update service.
Microsoft Edge
Microsoft Edge does not have a setting to disable updates. However, you can block updates by adding a rule in Windows Defender Firewall to block all outgoing traffic for C:\Program Files (x86)\Microsoft\EdgeUpdate\MicrosoftEdgeUpdate.exe
Also disable the MicrosoftEdgeElevationService and edgeupdate, and edgeupdate services.
Microsoft Office
In any Microsoft Office application, go to File> Account. Then click Update Options> Disable Updates.
This only needs to be done once; not for each Office application.
Google Chrome
Similar to Microsoft Edge, there isn’t an option to disable updates, so we’ll block them in Windows Defender Firewall and disable services.
In Windows Defender Firewall, block all outgoing traffic from the application at C:\Program Files (x86)\Google\Update\GoogleUpdate.exe.
Disable the services GoogleChromeElevationService and gupdate services.
Mozilla Firefox
Mozilla Firefox actually does have an option to disable automatic updates.
In the settings, go to the General tab, scroll down to Firefox Updates, and select Check for updates but let you choose to install them.
Visual Studio Code
Go to File> Preferences> Settings. Search for Updates, then uncheck:
- Extensions: Auto check for updates
- Updates: Enable Windows background updates
Disable Microsoft Defender
Of course, when analyzing malware, you don’t want anti-malware removing it, so disable Microsoft Defender as well. The best way to do this on Windows Pro or Enterprise is to use the Group Policy Editor.
- In the Start Menu search, type
gpeditand press enter - Navigate to Computer Configuration> Administrative Templates> Windows Components> Microsoft Defender Antivirus (Called Windows Defender in earlier versions of Windows 10), and enable the Turn off Microsoft Defender Antivirus setting.
Or, if you are using Windows 10 Home, use regedit to add a registry key under
1
2
HKLM\Software\Policies\Microsoft\Windows Defender
DWORD "DisableAntiSpyware" "1"
Disable scheduled tasks
Some applications, including OneDrive and Microsoft Edge have scheduled tasks to run at startup and/or check for updates. Disable these tasks in Task Scheduler.
Allow all Powershell scripts to run
1
Set-ExecutionPolicy -ExecutionPolicy Unrestricted -Scope CurrentUser -Force
Lab realism
Labs should not be sterile spaces devoid of content. How can you observe ransomware if there are no non-system files to encrypt? Add pictures, music, documents, and other files. Open these files so that recently opened file lists are populated. Browse websites that do not contain ads and are unlikely to contain malware, such as Wikipedia and government websites, so that you have established browser history with minimal rick of prematurely infecting the lab.
The goal is to make the lab look as “lived in” as possible.
Install common software such as Microsoft Office, Adobe Acrobat Reader, Google Chrome and,, Mozilla Firefox.
Some malware will only run on systems that are joined to a domain, so you may want to add a Domain Controller to your lab environment. More targeted malware might only run properly if it is running on a system that is a member of a domain with that specific target’s domain name, so it might be useful to use the same domain name in your lab. However, keep in mind that this can give attackers an indication of who might be analyzing their malware, if they are paying attention to such things.
Similarly, some organizations may opt to base one or more lab systems on the “golden image” they use for actual systems. This can help determine how malware might behave on the organizations’ systems, but could disclose operational details to an attacker, if such a lab accessed the internet.
Tools to include in your lab systems
Cross-platform tools
While there are projects such as Mandiant’s FLARE-VM that are designed to automatically install a standard set of analysis tools. I find that FLARE-VM changes too many settings to values I don’t like, and it leaves behind many ways of Identifying a VM as a FLARE-VM analysis VM. So, I prefer setting up tools manually.
| Name | Description |
| Binary Ninja | A commercial disassembler, decompiler, and debugger, similar to IDA, but with much more reasonable pricing Note: It does not run in older Linux releases, like REMnux/Ubuntu 20.04 |
| CAPA | Identifies capabilities in executable files |
| Cutter | A free, open source reverse engineering platform powered by Rizin |
| CyberChef | The Cyber Swiss Army Knife by GCHQ can perform many different data manipulations, right inside a web UI on the local filesystem |
| Debloat | A GUI and CLI tool to remove excess garbage from bloated executables |
| Detect-it-Easy | Detects file types and metadata |
| exiftool | Displays metadata for a wide verity of file types |
| FakeNet-NG | Next Generation Dynamic Network Analysis Tool |
| FLOSS | Automatically extracts obfuscated strings from malware |
| Ghidra | An open source disassembler and decompiler built by the NSA for software reverse engineering |
| IDA Free | A version of the ADA disassembler and decompiler for non-commercial use |
| ILSpy | .NET Decompiler |
| PE-Bear | Fast and flexible “first view” for malware analysts |
| Python | Scripting language |
| Visual Studio Code | A powerful code editor, with community extensions for wide a wide verity of file types, programming languages, and development tools |
| YARA | A tool aimed at (but not limited to) helping malware researchers to identify and classify malware samples. All malware samples and rules should be kept separate from infected systems, so they cannot be exfiltrated. |
For more details about Ghidra, follow my Ghidra Setup Guide
Windows-only tools
| Name | Description |
| API Monitor | Monitor and control API calls made by applications and services |
| AMSIScriptContentRetrieval | Retrieves logs from AMSI data |
| Dependency Walker | Seans a Windows PE and and builds a hierarchical tree diagram of all dependent modules |
| dotPeek | Freeware .NET decompiler |
| Exeinfo PE | Detects Windows PE packers |
| Fiddler Classic | A proxy that can decrypt, view, and record HTTPS traffic |
| HxD | A freeware hex editor |
| Noriben | A Python-based script that works in conjunction with Sysinternals Procmon to automatically collect, analyze, and report on runtime indicators of malware |
| PEStudio | Malware initial assessment for artifacts in Windows PE files |
| pe_unmapper | Converts between PE file alignments and memory alignments |
| ProcDOT | Generates visual graphs of Procmon and PCAP data Requires Graphviz, Npcap, and WinDump for Npcap Thread ID field must be turned on in Procmon, and the Procmon data must be exported as a CSV. |
| Process Explorer | Windows Sysinternals tool that shows you information about which handles and DLLs processes have opened or loaded |
| Process Monitor (Procmon) | Sysinternals tool that shows real-time file system, Registry and process/thread activity |
| Regshot | Allows you to take before-and-after snapshots of fille listings and the registry for comparison |
| runsc | Allows debuggers to attach to shellcode |
| scdbg | Shows the user all of the Windows API the shellcode attempts to call |
| setdllcharacteristics | CLI tool that sets DLL characteristics (like DLL can move, (i.e., ASLR) of windows PE files |
| Scylla | Reconstructs PE imports |
| System Informer | Monitor system resources - like task manager on steroids |
| Wireshark | Network protocol analyzer |
| x64dbg | An open-source x64/x32 debugger for Windows Plugins: Scylla (included with x64dbg) - Imports fixer OllyDumpEx - process dumper ScyllaHide - Anti-anti-debugging debugchild - Debug a child process |
Consider renaming
procmon.exe,procexp.exe, andRegShot-x64-Unicode.exe. Some malware will check if these processes is running.
Place CLI tools such as
capa.exe,exiftool.exe,floss.exe,setdllcharacteristics.exeandyara.exein a common folder, then add that folder’s path to thePATHsystem environment variable.
Configure Process Monitor (procmon)
- In Process Monitor (Procmon), click Options> Select Columns
- Under Event Details, ensure that Sequence Number is not checked
- Under Process Management, ensure that Process ID and Thread ID are checked
- Click OK
- Close Procmon
Configure ProcDOT
- When prompted, configure the locations of
dot.exe(part of Graphviz), andWinDump.exe - Close ProcDOT
Keep analysis tools updated
Exploits of analysis tools and hypervisors do exist. Ghidra, the open source reverse engineering tool was vulnerable to Remote Code Execution and Denial of Service exploits via Log4j. Multiple hypervisors have had vulnerabilities that could allow code on a VM to escape the hypervisor and run on the host machine. It is important to keep your analysis tools updated, including tools on the lab machine, the host hypervisor, and the host operating system and BIOS.
Use snapshots
It is critical to have a known good state to start with and go back to between analyzing different malware samples. Take a known good snapshot or drive image. If needed, take more at different stages of analysis to give yourself more time to investigate changes.